Category - Getting Crafty

The Jesse Tree

But a shoot shall sprout from the stump of Jesse, and from his roots a bud shall blossom. Isaiah 11:1

Part One of Three

So what exactly is a Jesse Tree?

Well, it’s simply a tree decorated with ornaments that tell the story of Jesus’ ancestors and of the events leading to Jesus’ birth. The name is taken from Isaiah 11:1,”But a shoot shall sprout from the stump of Jesse, and from his roots a bud shall blossom.” (Jesse, you’ll remember is the father of King David.) During Advent, one ornament is hung on the tree each day. You can read an accompanying scriptural passage or just say a line or two about the meaning of the ornament.

From CatholicCulture.org :

THE STORY OF THE JESSE TREE Jesse was the father of the great King David of the Old Testament. He is often looked upon as the first person in the genealogy of Jesus.

In Church art a design developed showing the relationship of Jesus with Jesse and other biblical personages. This design showed a branched tree growing from a reclining figure of Jesse. The various branches had pictures of other Old and New Testament figures who were ancestors of Jesus. At the top of the tree were figures of Mary and Jesus. This design was used mostly in stained glass windows in some of the great medieval cathedrals of Europe. The Cathedral of Chartres (which was dedicated in 1260) has a particularly beautiful Jesse Tree window.

Interestingly, there is not one set of “right” Jesse tree symbols. You can do a search for them on the internet and in books, but most lists will vary in some way. If you want to start a Jesse Tree for your family, pick a list that appeals to you. Many of them have scriptural readings associated with each symbol. Or combine lists to make it unique to your family.

Ornaments can be anything you want – purchased or found items or you can craft some or all of them yourself. Fun foam, sculpey clay, felt- anything that works for you.  You could even print out pictures from the internet and tape them to the wall in a tree shape.

The Jesse Tree is so much more than a count-down to Christmas.   It is the telling of the story of God’s love and the promise of the Savior.  If you’re looking for a way to really emphasize the holiness of Christmas, the Jesse Tree can be a simple but effective tool.  While I think that the Jesse Tree is primarily a Catholic thing, there is no reason that other Christian denominations can’t start this fun tradition.

In Part 2 of my Jesse Tree Series, I’ll talk about the Jesse Tree Craft Swap that I am hosting, along with information on how to organize your own swap and some valuable lessons that I learned.

More information about the Jesse Tree Swap here: Jesse Tree Craft Swap

See the completed Jesse Tree Ornaments here: Jesse Tree Ornaments

Martinmas Lanterns

In a rare convergence of prior planning and creativity, the children and I made lanterns for Martinmas, which isn’t until November 11. I was planning on making them last year, but early in November we went on vacation and our house flooded, landing us in temporary housing for a couple of weeks until we could move into a new house. Kind of ruined our plans.

This year was different. I knew what I wanted to do and when I wanted to do it. I had all the supplies on hand anyway, so it wasn’t that hard to pull off.
First we read up on St. Martin of Tours. I was pleased to find out that Boo had already learned a little about him at his Religious Ed class, so I let him tell what he remembered of the story first. Then we talked a little bit about Martinmas traditions, including the making of paper lanterns, parading around and singing songs.

So now I present our Martinmas lanterns. You probably have most of the supplies at home, if not then you still have time to run to the store and get them.

cimg2691.JPG

Here’s our basic supplies. A sheet of 12×12 cardstock for each lantern and tissue paper. 12 x 12 cardstock can be found with the scrapbooking supplies at your craft store. Or ask a scrapbooking friend, she’ll have a variety of colors to choose from and will most likely be happy to give you some.

So here we go! Cut 2″ off one end. Save the scraps!

cimg2693.JPG

 Fold 3/4″ from the cut edge and glue it down. I used a Fiskars paper cutter with the scoring blade to help fold the cardstock. You can use the flat edge of a butter knife to score the paper, then use the handle to flatten the fold down.

cimg2696.JPG

 Draw a line 2″ from the bottom edge, score along that line…

cimg2697.JPG

 …and cut notches. Be careful not to cut past the line.

cimg2698.JPG

Draw figures or shapes to cut out. If you enlarge the above picture, you can see that I sketched with pencil first, then outlined with a black marker to make it easier to see where to cut out.

I highly recommend basic shapes about 1″-2″ in size. The moon and stars on Pumpkin Girl’s lantern were about right. The little girl was way too detailed, even for me to cut out. I also marked off about 1″ on the right where the paper will overlap when glued together.

Below is Boo’s lantern. His has fall leaves which were easy to draw and simple enough to cut out. Remember that card stock is much thicker than paper, so simpler is better. However, his tree was much too big and open.

cimg2699.JPG

 I highly recommend not drawing anything that is grounded on the bottom line, like the little girl and the tree. It weakens the lantern when you glue it together. Stick to things that are free floating like the leaves and stars.

Cut the shapes out carefully. The sharper the scissors, the better.

Cut tissue paper to fit the inside of the lantern. Don’t go crazy measuring and trying to get a perfect fit. You can use one piece for the whole lantern or use smaller pieces in different colors for each cut out. Glue the tissue paper over the cut-outs. Make sure you get the glue right up to the edges of the cut-outs so that the tissue sticks well when the lantern gets rolled up. I had my children use glue sticks for this part since tissue paper is so fragile.

Glue the short sides of the cardstock together to form a tube with the tissue paper inside. Overlap the edges where marked and use paperclips to hold together while drying.

Push the notches down to make a base. Here we used white glue because the cardstock didn’t want to behave itself. I also used scrap pieces of cardstock to make it stronger. For Boo’s I used the top of his cut out tree, for Pumpkin’s I used cut a 3″ piece from the strip we cut from the very beginning.

cimg2705.JPG

 Below are the finished lanterns. You can attach a ribbon or string across the top so that the lantern can be carried on a stick for Martinmas lantern walk. Or leave as is for a table decoration.

cimg2707.JPG

cimg2709.JPG

 Of course, these lanterns are highly flammable! Please don’t use real candles with them. We are using those fake tealights that are widely available. You could also use chem light sticks.

cimg2706.JPG

 So there we have it – simple paper lanterns for Martinmas.  I hope you enjoyed my little tutorial.   I can’t believe that I both made crafts with my children AND remembered to take pictures for the blog.

Merry Christmas

… to me!  Ho ho ho, look what arrived yesterday:

cimg2678.JPG

For the non-knitters out there, it’s an umbrella swift and a ball winder.  I’ve wanted one for a while, but couldn’t really justify spending the money when 2 ladder back chairs and my own hands will accomplish the same thing.  However, having this pile waiting to be turned into usable balls of yarn:

cimg2682.JPG


I decided I needed the swift and winder. It’s an early Christmas present, since they are kind of expensive.  Almost as expensive as the yarn waiting to be wound.  Ahem.  (I will not create a stash of yarn, I will not create a stash of yarn, I will not…stop laughing, Shanti!)

After dealing with cryptic Japanese instructions like “Thrust the yarn guide in over a boss posititioned at the reverse side of the base until clicking” and no instructions for the swift, I got it all set up.

So instead of spending 30-45 minutes winding one hank of yarn (and that’s IF I don’t tangle it,which has only happened once) it only takes 10 minutes to turn one of these pretties

cimg2679.JPG

into this:

cimg2681.JPG

And that’s including the time spent figuring out what to do. Let’s just say I love it.  Thanks, Philip!

By the way, Someone is getting a Christmas present  made from that yummy newly wound ball of yarn.  (It’s Lorna’s Laces Lion and Lamb and worth a small fortune every penny. ) I can’t tell you more than that.  But for more inspiration on handmade gifts, Dawn at By Sun and Candlelight is hosting The Loveliness of Handmade Gifts on November 8th.  It’s not too late to submit pictures or a post to this fair.

Finally Finished!

I finally finished this sweater vest for Boo.  He picked out the color himself, it’s more of a maroon than a red.  I think he may have a  genetic predisposition towards USC.  It’s a pretty simple and therefore kind of boring pattern, which is why it’s taken me something like 9 months to make it.  I think I shaped the back of the next incorrectly, but it got hidden in the seam.  Have I mentioned that I really hate picking up stitches around a collar?  Almost as much as I hate casting off in pattern. But it’s done and it’s cute and both Boo and I are pretty happy with the results.

BooVestSideBooVest

It’s made from Rowan Wool Cotton and it’s soft and yummy.  My next project will be a hat for Bip.  I’m hoping to take only a couple of weeks at the most on that one.

Seasonal Delights

By way of a couple of blogs I read (sorry, I can’t remember which ones), I discovered a new online magazine, Seasonal Delights.  All I can say is wow!  Normally, I don’t care to read magazines, books or instructions on the computer.  It bugs me to have to keep scrolling and nothing beats sitting on the couch with a cup of chai or sweetened ice tea.  But Seasonal Delights is an easy exception!

Their premier issue is 18 pages long, which is long enough to provide Autumn themed crafts and recipes, but short enough to actually read and savor and not end up lost among all your other files saved on your computer.  Beautiful, full color pictures and a nice happy font that is easy on the eyes.  Which is important when you’ve left your reading glasses w-a-y over there with the school books.  Oh, and it’s specifically for “young ladies and their mothers,” so the projects are simple to do but still beautiful.

For the month of September, they are offering free one year subscriptions to their magazine, and you’ll also get access to their blog, which will have additional seasonal activities.

Go check ’em out and tell them you heard about them right here at the Mac and Cheese Chronicles.

Look What I Made!

It’s a paper model of Neuschwanstein Castle in Germany!

Paper Castle1

Paper Castle2

Paper Castle3


Wait, it gets better!

Paper Castle4

Paper Castle5

I bought the model about 4 years ago at Seoul Tower in South Korea. They had several completed models on display and the kits for sale. I can’t even remember what I paid for it. I don’t know why it’s taken me so long to get to it, but in the process of de-cluttering, I got tired of seeing the box. I opened it up, looked at the instructions and my heart sank- they were all in Korean! But the parts were all labeled in English – A1, B1, etc. I could see from the pictures that I was supposed to take part A1, fold it and glue it to look like the example, then do the same for A2 and A3. At the end, A1 is glued to A2 and each tab and slot were also labeled in English. Tab 1 goes into slot 1 and so on. Just like Lego instructions. It was a little more complicated with the lights, but I got them working. The whole kit was so well made, with the precision and attention to detail that is so common with Asian made products (like my children, LOL!), that I hardly needed any glue. It only took me one weekend, working mostly in the evenings during movie time or after the children went to bed. I’d like to get an acrylic case made for it to keep out the dust.

Life in Minature

Am I the last person in the world to discover the fun of polymer clay?

You know, I’ve seen polymer clay projects before, but I was never
interested. Mostly what I’ve seen demonstrated are milifiori beads
which seem like a lot of work, and I’m just not into it. I’ve also
seen doll faces made with push molds, but again, it just wasn’t my
thing. I just kind of wondered, “what’s the point?”

Then last week, I saw an article in Family Fun magazine about making tiny treats out of polymer clay. These are just too cute and the directions were simple, needing nothing more than the clay and a toothpick. Well, not being one to pass up a good craft, I showed them to Boo and Pumpkin Girl and they thought they’d like to give them a try, too. They were actually pretty excited.

We got ourselves some Sculpey clay and went to work. These little projects are neither difficult to do or too time consuming, even when helping two children do different projects. Pumpkin needed a little more help because she didn’t seem to understand how not to smash the clay out of shape when adding details. But she did great doing things like rolling out balls and logs and squashing them flat. Boo did well with making his shapes look like the pictures, which is surprising because he’s not really not too good at copying objects to draw. I did the reading of the instructions and putting in the tiniest of details. I worked very hard at overcoming my tendency to just step in and do the project myself. I’m prould to report that I managed to demonstrate, step back, make small corrections and let the results be what they may. I guess all these weeks of being the craft lady for Pumpkin’s Daisy Scout troop is paying off. Talk about testing my patience! But that’s a post for another time.

Here’s the tiny little confections we made:
sculpeytreats.JPG

Pumpkin Girl made one of the donuts, the caramel apple and the cupcake. I made the other donut and the lollipop.

We also picked up The Incredible Clay Book and Create Anything With Clay. All I can say is wow! We’ve all spent a lot of time pouring over these wonderful books, choosing our next projects. We’re even plotting some gifts to make!

Here’s the projects we’ve made so far…

sculpeyanimals.JPG

The sheep and pig were made by Boo, the rabbit and frog by Pumpkin.

cimg1859.JPG

This baby and ice cream cone are Boo’s creations.

sculpeyveggies.JPG

I had as much fun and the children! I made these fruits and veggies. The green isn’t showing up well in this picture and the corn looks a lot better in person. Still, aren’t all these things cute?

I’m working so hard on not getting involved in any new crafts. But when I do, the main criteria it has to meet are low start-up cost and easy storage of the tools. Well, the instructions for the treats are free on the internet (click on “tiny treats” above), and you can get by with just a couple of basic colors of clay. We did buy the other two books, which came with clay, but the ideas were well worth it. There are lots of polymer clay tools out there to buy, but we literally used our hands, foil, a baking dish, toothpicks and wax paper. As for storage, the clay should be stored in plastic. I wrapped each open color in plastic wrap and the whole kit and caboodle is in a plastic shoe box. Sweet!

I’ve been crafting!

All of my scrapbooking and stamping supplies are still mostly packed up.  I had such lovely plans to hand stamp my Christmas cards this year.  Sigh.

But look!  I have managed to get some crafting done.  I made this little leaf child.  I’ve always wanted to make a nature table for the children to mark the changing seasons.  Inspired by the book  The Nature Corner, I have been wanting to make little Root Children for winter, with accompanying leaf children for spring and summer.  But I’m not very good at assembling all the bits and pieces for a craft project.  I can never find all of the components needed and so I never even start my projects.  However, I am tremendously successful when using kits.  I was so happy to find all the root and leaf children I could want at Silken Sky Studio.  This little cutie is Grass.

Cimg1583

I’ve also been getting in some knitting during Charlotte’s ballet class.

Cimg1585


You can find the pattern here: Multidirectional Diagonal Scarf.  Not that there is much need for a scarf around here these days. The yarn is Koigu Premium Merino, but I can’t tell you the color because the label seems to have gotten lost in our flood.  It was so pretty at the yarn store that I couldn’t leave it behind.  Doesn’t it look good next to my pink coat?

Cimg1586

Knitting Victories

Several months ago, I reported on the knitting disasters that I had snatched from the jaws of victory. Nearly completed, these projects sat in a basket over the summer, while I denied their existence and pretended that they weren’t really bugging me. Based on past experience, these projects would have remained in permanent time out, never to be seen again. But these were for my children, who have the annoying habit of outgrowing their clothes. Either I finished their sweaters this Fall or they would never wear them. So I got crack-a-lackin’ and behold – finished projects!

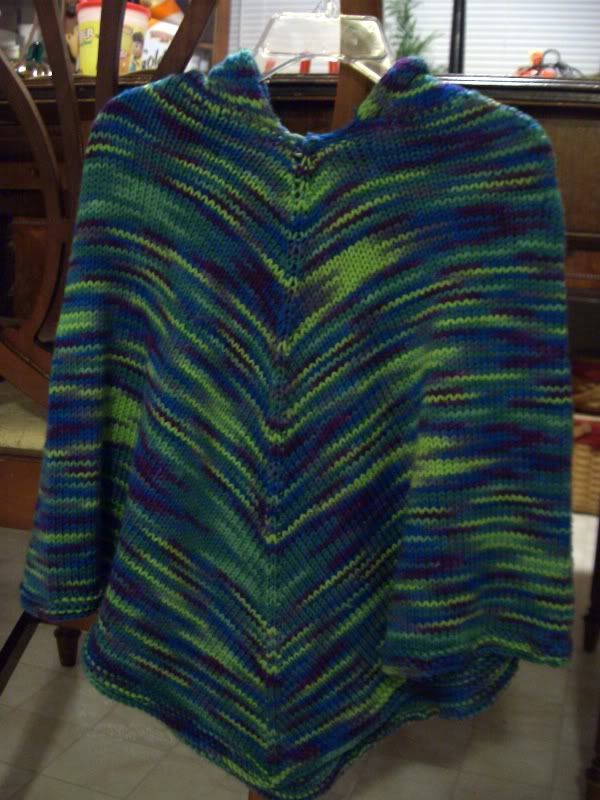
First, I give you Pumpkin Girl’s “pom pom”:

When I first finished it, it was barely big enough to fit her. My long time crafting buddy reassured me that a good soaking and careful blocking would teach that poncho who’s boss. She was right. The yarn is a very soft, very blockable merino and was happy to become the correct size. I’m happy to report that Pumpkin Girl should get at least 2 year’s wear out of it.

And now, Bip’s sweater.

Before it was all made up, there was a bit of concern as to whether or not it would fit his pudgy self. With the edges rolling up all over the place, it did look a bit small. However, now that he’s worn it, it looks like he’ll be able to wear it at least until Spring, possibly even next Fall, too.

This sweater almost didn’t happen. It was almost all done and I was weaving in and clipping loose yarn ends. I clipped a little too close and the next thing I knew, a hole was growing right in the center of the sweater front. I almost cried. I managed to stick the now live stitches on a holder to prevent further damage. Believe it or not, I completely mended the hole and properly weaved (wove? woved?) in and secured the ends, without a trace of the hole! Even from the back, you have to look really hard to find the mending. Note to self: start a new ball of yarn at the end of the row, like every good knitting book says so you can tie it off with a big ol’ honkin’ square knot (gasp!) which you can then hide in the seam.


Copyright The Mac and Cheese Chronicles 2020.  All rights reserved. Images and content may not be used without express permission.