Archive - 2014

A Monster In the Hole of Your Jeans

A while ago a found a pin on Pinterest where someone repaired a hole in her son’s jeans by making a monster face out of it.  But she didn’t include any instructions.  Hmm. So I figured it out for myself and I even remembered to take pictures for a little tutorial.Monster Face Jean Repair

Supplies:
Ripped jeans
Fabric glue -I used Fabric-Tac, but use whatever you can find, just make sure it is washable.
Iron On patches
Felt scraps in red, white and black

I found all my supplies at Hobby Lobby.  The Fabric-Tac is hard to find, look for it with the fabric paint.

First, cut away all the strings from around the hole. Turn the pants inside-out.

HoleInJeans

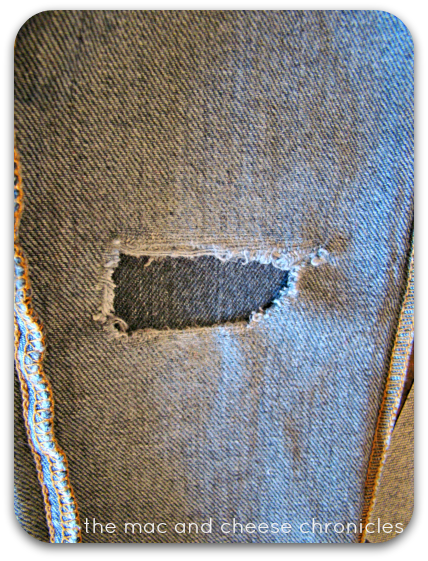
Cut a piece of red felt to be a little bigger than the hole.  I think mine was half an inch bigger, all the way around.  I didn’t measure.  I just laid my felt over the hole and drew lines with a pen, then cut it out.

RedPatch

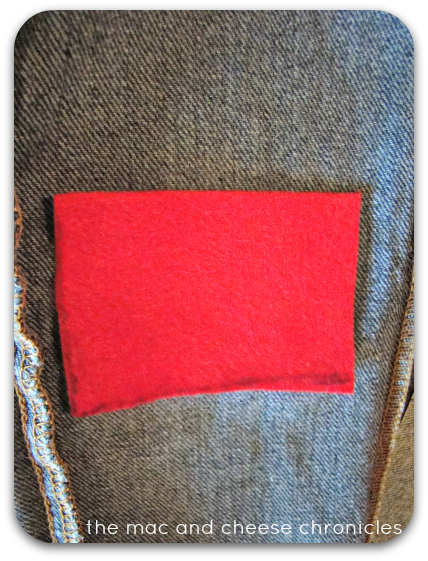
I used an iron on patch to give the felt some stability because  I didn’t think that the felt would last very long on its own. Get an iron-on patch that is bigger than the felt.  The bigger, the better.

Read the instructions for your patch.  Lay your jeans on the ironing board, center the felt over the hole, then center the patch over the felt *adhesive side down.*  Remember that you are working on the inside of the jeans.Patch

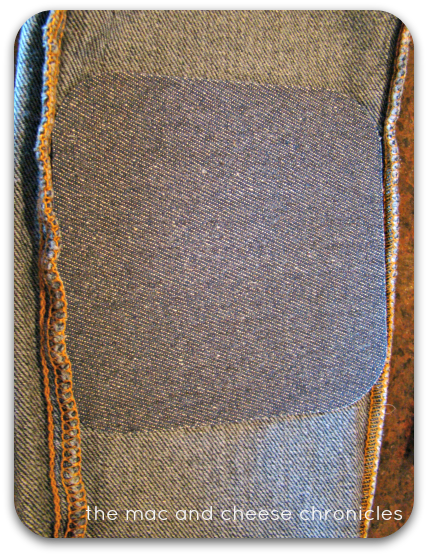
Iron the patch onto the jeans and felt, according to the patch instructions.

Turn your jeans right side out.  Now you have a hole patched with red felt!  Cut out eyes from the white felt and pupil from the black felt.  I made my eyes different shapes to be silly.  Cut teeth from the white felt, too.  Position the face pieces however you like them.  Move them around until you get the look you want.

Monster Face

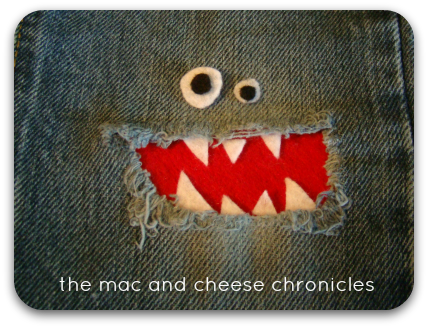
You’ll notice that there is sort of a flap where the jeans fabric overlaps the felt but is not adhered to it.  Position the teeth so that they are just under that flap.  Glue them in place with the fabric glue.  You may need a toothpick to push the teeth into place.  Stick some glue under that flap and glue it down, too.

Glue the eyes into place.

Allow to dry and cure before washing.

Sit back and admire the silliness.MonsterFace

Craft Room Progress

I’ve been working on my craft room for about a month now, off and on as time allows.  Here’s where I am right now. (The pictures are off my phone, sorry for the quality.)

First up, here we are looking in from the door.  It’s pink!  With a window! And carpet!

Craft Room Entrance

To the right of the door is my Wall of Storage.  The brown cubbies will be moved to another room and the beige containers will be replaced with pink ones.  I’m just waiting for them to go on sale again (probably next month).  Everything that is sitting out will be put into fabric bins, too.  This picture has the truest representation of the pink color of the room.


Storage wall

My craft table! With Ott light, phone, and the stool Boo assembled for me. Everything under the table is leaving, everything on the table is waiting to be put away.

Craft Table

These two black towers of drawers hold rubber stamps and accessories.  Don’t judge.  This is *after* the first purge when we moved here.

Stamp Bins

And the closet.  We removed the doors and a built-in shelf and stuck the bakers rack in there.  Every single thing that is on the floor in this picture is leaving!!

Craft Closet

I have an actual, functional craft room now!  It’s messy, yes, but I can use it.  I went in there just yesterday to cut paper with the guillotine paper cutter.  Just walked right in, didn’t have to step over anything, didn’t have to move anything out of the way.  Just cut the paper, put the scraps in the scrap bin and left.

It’s dreamy.

Next will be getting those new pink fabric bins, clearing out the rest of the things that don’t belong, and doing a little decorating.

If you promise not to laugh, you can see how it started off here: Craft Room Do Over.

Pinewood Derby Cars Through the Years

Ah, it’s that time again.  The annual Grin-and-Bear-It Fest known as Pinewood Derby.

Why, Cub Scouts, why? Those of us who are woefully lacking in woodworking skills and equipment are already aware of our deficiencies, so we don’t need this reminder. Nor do we need the chance to see how well other parents are able to paint an accurate replica of Lightening McQueen.  (By the way, parents – nobody is fooled.  We know it was you.) And pasting that fake smile on, telling your poor child that yes, his car came in dead last in all heats, but by golly, we had FUN making it!

Can I get an “amen”?

And yet…here we go.

Our cars have been historically slow.  Like, barely finishing the race slow.  But it’s true that they have looked cool.

Our very first year, Boo made a Ghost Car.  He liked the little guy and the fake engine you could buy.
Ghost Car
The next year, Boo made a Humvee.  He painted it all himself.  He used a sponge brush and pounced, pounced, pounced in the direction I told him.

Humvee Pinewood Derby Car

Humvee Car

Pumpkin Girl made this one, complete with glitter.  She called it the Becky Angel Car.

Becky Angel Car

Read about how well this car did here: Showing Her Quality

We had a stroke of good luck the following year with Boo’s Tongue of Flame car that place 3rd in his pack.
Tongue of Flames CarThe American Flag car was Pumpkin Girl’s entry into the Powder Puff Derby that year.  The front of the car is actually the field of stars, so the flag flows back while it goes down the track.  It won first place in her Brownie Troop.

American Flag CarBip entered his own car into the family division that year. He was 3 years old and he did all the green painting himself.  I did the teeth, mouth and nose.

Alligator CarThat ended up being our last Pinewood Derby for a couple of years.  We moved to CO only to find that Web 2s don’t do Pinewood Derby here.  Bip’s next entry into Pinewood Derby was his first time as a Cub Scout.

A little piece of me died when he told me that he wanted an R2D2 car and I realized just how mom-intensive this was going to be.

First, we researched.  Some very over achieving parents have gone to great lengths to make a near-exact R2D2 replica.  I would not be doing that.

First, we found a friend to use magic or a lathe or something to turn the block of wood into a rounded shape for the top of R2.  Then Bip base painted him white.  I tapped off the bottom to be black to show negative space, as well as the flames as R2 burst (in theory) away from the starting block.

R2D2 Pinewood Derby Car

With painstaking work and a ton of masking tape, I had R2 ready for the details.  First silver for his head.  Then tons and tons of blue shapes.  I drew the rest of details for Bip to paint.  What you see is all his work, with some mom assistance.

R2D2 Car

R2D2 was a crowd favorite. Let’s just leave any further commentary at that.

Pumpkin Girl’s entry was a pizza car.  Please note, the wheels look like pepperoni.  Her inspiration was an actual slice of pizza that had a pepperoni stuck to the side.

Pizza Pinewood Derby CarLast year I got off easy, with a Wii remote car.  I also told Phil that it was his turn now to help with the cars.  Ta-da!!

Wii Remote Car Wii Remote Pinewood Derby CarIt was exactly as aerodynamic as you’d think.   When we lose, we look good doing it.

The Wedge O’ Cheese (with mouse) was Pumpkin Girl’s entry.  You know why I like her?  She comes up with her own ideas and executes them independently. It’s hard to see in the picture, but it really is wedge shaped.

Wedge of Cheese CarAnd now Pinewood Derby looms again.  Can someone get me an Exedrin?

A Month of Instagram: January 2014

It was a cold month.

A Month of Instagram1.  New Year’s morning tradition: Eggnog Puffed Pancake
2.  I hung Becca’s rainbow fairy mobile in my new craft room
3.  70 degree difference between us and Disneyland
4.  Dinner is happy to see us (pancakes made on Phil’s new griddle)
5.  Someone made off with my new Ikea trash baskets
6.  LTC Freeze (front and center with the green scarf) has amassed his army.
7.  Asleep with his weapon – a Marine in the making?
8.  I don’t know how his hair does this. My grandpa would have said he has wavy hair…because it stands up and waves.
9.  Forecast high of 61…my boys wear shorts.
10.  Furby play date on my bed.
11.  Boo built me this chair for my craft room. I heart him.
12.  Building lockets with my daughter.
13.  Not quite “light snow”. #ilovewinter #ilovecolorado
14.  Malibu light wishing it was in Malibu.

All Is Calm: January, Part 2

All Is Calm:  Christmas Planning Year Round (with free printables)

I was only going to offer new Christmas Planning pages once a month, but in reading the comments from my first post, I realized that there were a few things that would be most helpful before January is over.

One theme from the comments was budgeting.  People want to budget better and budget earlier.  That’s such a great idea!  I created 2 pages that work together for Christmas budgeting.  First is a worksheet to write down items you need to purchase, the amount you want to budget, and the amount you actually end up spending.  I kept this form simple and generic (I’m going to keep saying that!) so that you can fill it in however you like.  If you want to write one line for “gifts”, you can.  If you need to be more specific and budget by name of recipient, you can do that, too.  Other things you might want to budget for include decorations, travel expenses, clothing, wrapping supplies, cards and postage, and craft supplies.

Christmas Planner Part 2

In this set, there is also a Gift Planner.  This is more of a brainstorming worksheet, where you can list every person you might want to give a gift to.  Family, friends, neighbors, kids’ coaches and teachers – list them all here.  Even if you don’t know future teachers’ names, you do know if you’ll need gifts and how many.  And if you do a gift or ornament exchange, make sure you write that down, too.  Even if you give a lot of baked goods, get that written down. This is all about getting information out of our heads and down onto paper!  Once you have a clearer idea of the gifts you need to purchase, make or bake, you can budget appropriately.  Oh, and don’t forget any charitable giving, like angel trees or Operation Christmas Child. (There will be additional gift planning pages coming.  Those will help you plan more specifically.

I also created a Holiday Spending Tracker.  If you’re super organized and start your Christmas buying early, you have a way to track that right now!

The Traditions worksheet is one for the whole family.  Write down every single thing you do to celebrate Christmas.  Advent calendar, daily advent readings, decorating the tree, lights on the house, caroling, baking, whatever…write it down.  Make sure all your family members get a chance to add to the list.  Then as a family, prioritze the list!  You’ll notice I added a line down the left of the page.  That’s the space for you to assign each item a priority level. The whole point of this worksheet is to see if there are things that can be dropped when the season gets stressful, or maybe even dropped altogether.  Once you’re finished, just stick it in your planner and let it percolate.  We’re going to come back to it later.

The last page is for those of us who write newsletters to send out with our Christmas cards.  It’s a Year in Review page that lists all the months with just a few lines underneath.  Again, how you use this is  up to you.  I’d recommend writing just one line per family member each month.  Record milestones, accomplishments or other noteworthy events. When it comes time to write your newsletter, get this worksheet out and write it up.

I also added the Notes page to this download.  As you’re working on these pages, you are likely to think of other things we haven’t talked about yet.  Write down all those ideas as you think of them so that they aren’t lost to the chaos of everyday life.

Click here for Christmas Planner Pages, Part 2.

My question for you today is, what is the most beloved Christmas tradition in your family?

Hot Sweet Pickles

Here is another recipe that you will absolutely thank me for.  Normally I am not a fan of sweet pickles, but these are different.  They are just a little bit sweet and have a bit of kick. The recipe comes from my friend Tami and she served them on top of a cracker spread with cream cheese.  It was a sweet, creamy, crunchy, hot explosion of yum! I would endeavor to restrain myself at her house and only eat a few at time.  Now that I have the recipe, I can sneak down for a late night snack with only the cats to judge me.  Not that I would do that.  But I could and…well, let me just share the recipe.

Hot Sweet Pickles

Hot Sweet Pickles

Ingredients

  • 1 gallon dill pickles
  • 2 cups sugar
  • 1 small bottle Tabasco sauce
  • 1 head of garlic, separated into cloves and cleaned

Instructions

  1. Drain the pickles and discard the liquid. Slice pickles into 1/2 inch slices and return to jar.
  2. Add remaining ingredients.
  3. Put the lid back on the jar and shake the whole thing like crazy.
  4. Refrigerate. Shake the jar 1-2 times a day for one week.
  5. Eat plain or serve with crackers spread with cream cheese.
https://themacandcheesechronicles.com/2014/01/15/hot-sweet-pickles/

A Month of Instagram: November 2013

Yeah, I’m a little behind.

Nov13IG

1.  Because nothing says “Birth of Christ” like a sparkly, light up pig.  In a Santa hat.
2.  20 years of service will tire a guy out.
3.  We’re getting close! (at the time)
4.  Two of my favorite men.
5. Starter kit!
6.  There was a ghost in my pork chop.
7.  Getting Five Guys after a long rehearsal.
8.  Out for a lunch date?  I found these two about a block from my house.
9.  Asleep standing up.
10.  Bliss
11.  What can I say? I love this girl!  (text says Follow Your Heart)
12. Just a few more days! (at the time).  (text says This Is the Year)
13.  Rainbow plates ready to serve pumpkin pie.

Christmas is Over, time to plan

We packed up the last of the Christmas decorations today (don’t judge), pushed the armchairs back into their normal places, and sighed wistfully at the now naked staircase. Yes, my friends, Christmas is over. So that means…it’s time to plan for next Christmas! I know, I’m crazy. But I’m a big fan of the All is Calm Christmas and that takes some planning. I made some rookie mistakes this year and found myself needing to have a little lie-down every so often, so I wouldn’t get too stressed.

Not that having your daughter star as Clara and Fritz and having your son make Eagle Scout isn’t stressful enough, but throw in some holidays and birthdays and…excuse me me while I go lie down for a moment.

Ok, I’m back.

So I’m going to try some thing new this year and I would like for you to come along for the ride. There’s likely to be free planner pages in it for you!

AllisCalm4I’m going to start planning for next Christmas right now and sort of spread the thoughts and plans out over the year. My goal is to reach December in such a state of calm and collectedness that all I have to do is flip on the fireplace (it’s gas) and sit down with a nice cup of eggnog and listen to Christmas carols. Of course, whether this happens or not remains to be seen, but it sounds good, right?

Here’s what we’re going to do today. We’re going to sit down and think back to the holiday season.  Then we’re going to write down the things that worked, the things that didn’t work and the things we wished we’d done better.

No beating yourself for not pulling off the Perfect Family Christmas, because that’s never going to happen anyway.

Look, here’s a lovely printable planner page to help you! Christmas in Review There’s 2 pages, the Christmas in Review page and a notes page.  Stick them in your home management binder or under C (for Christmas) or H (for holidays) in your A-Z file.  Or start a new Holiday Planner!  There will be more pages coming, including a cover/divider.

CIRpage

And here’s where I’m taking a risk. After you’ve filled out this worksheet, come back here and tell me what was the best thing that happened during your holiday season and what is one thing you wished you could have done better. Don’t leave me hanging with no comments, ok?  I’ll go first.

Craft Room Do Over

I was thrilled that we bought a house that would give me a craft room. I envisaged many days of crafting bliss in a neat and tidy room. All my supplies at my finger tips and a cat sleeping peacefully nearby.

Four and half years after moving in, the room looked like this.
CraftRoomBefore1

Don’t just stand there at the door! Come in, come in.  On your left…more junk!

CraftRoomBefore2

Don’t forget to look to your right and notice my nice work table.

CraftRoomBefore3

Behind you is the closet and don’t miss the lovely pile in front of the window.

CraftRoomBefore4 CraftRoomBefore5

Pretty horrid, isn’t it.

The room was never more than a glorified storage room and everyone just kept adding to it.

I was so over it. I actually hated it. So I decided to overhaul it.

Step one, empty the whole room. Everything but the bakers rack and one drawer unit were removed. Then we painted it. By “we”, I mostly mean the husband. And by paint, I mean pink! It is my signature color, according to Pumpkin Girl, so why not?

PinkCraftRoom

It’s super hard to photograph because of the way the light comes into the room, so take my word for it – it’s a very lovely shade of pink.

I am very much enjoying my pink craft room and ignoring the fact that the entire contents of the room still need to be dealt with.

Epiphany 2014

three-king_1388657815Here we are at Epiphany already!  I hope your Christmas season was a good one.

We will be blessing our house once again this year.  We use the following simple blessing. We’ll probably do this on Sunday because we get too busy during the week, but the actual date of the Feast of the Epiphany is Monday, January 6.

Epiphany Blessing

All make the Sign of the Cross.

Head of Household: “Peace be to this house and to all who dwell here, in the name of the Lord.

All: Blessed be God forever.

Reader: In the beginning was the Word and the Word was with God, and the Word was God. He was in the beginning with God. All things come to be through him, and without him nothing came to be….. And the Word became flesh and dwelt among us, and we saw his glory, the glory as of the Father’s only Son, full of grace and truth. (John 1:1-3.14)

Above the entryway to your house, write with chalk:

20 + C + M + B + 14

(This is the initials of the three magi -Caspar, Melchior and Balthasar – with the numerals of the new year surrounding them. C, M, B can also be interpreted as the Latin phrase “Christus mansionem benedicat” which means “Christ bless this house”.)

All: Lord God of heaven and earth, you revealed your only begotten Son to every nation by the guidance of a star. Bless this house and all who inhabit it. May we be blessed with health, goodness of heart, gentleness and the keeping of your law. Fill us with the light of Christ, that our love for each other may go out to all. We ask this through Christ our Lord. Amen.


Copyright The Mac and Cheese Chronicles 2020.  All rights reserved. Images and content may not be used without express permission.